
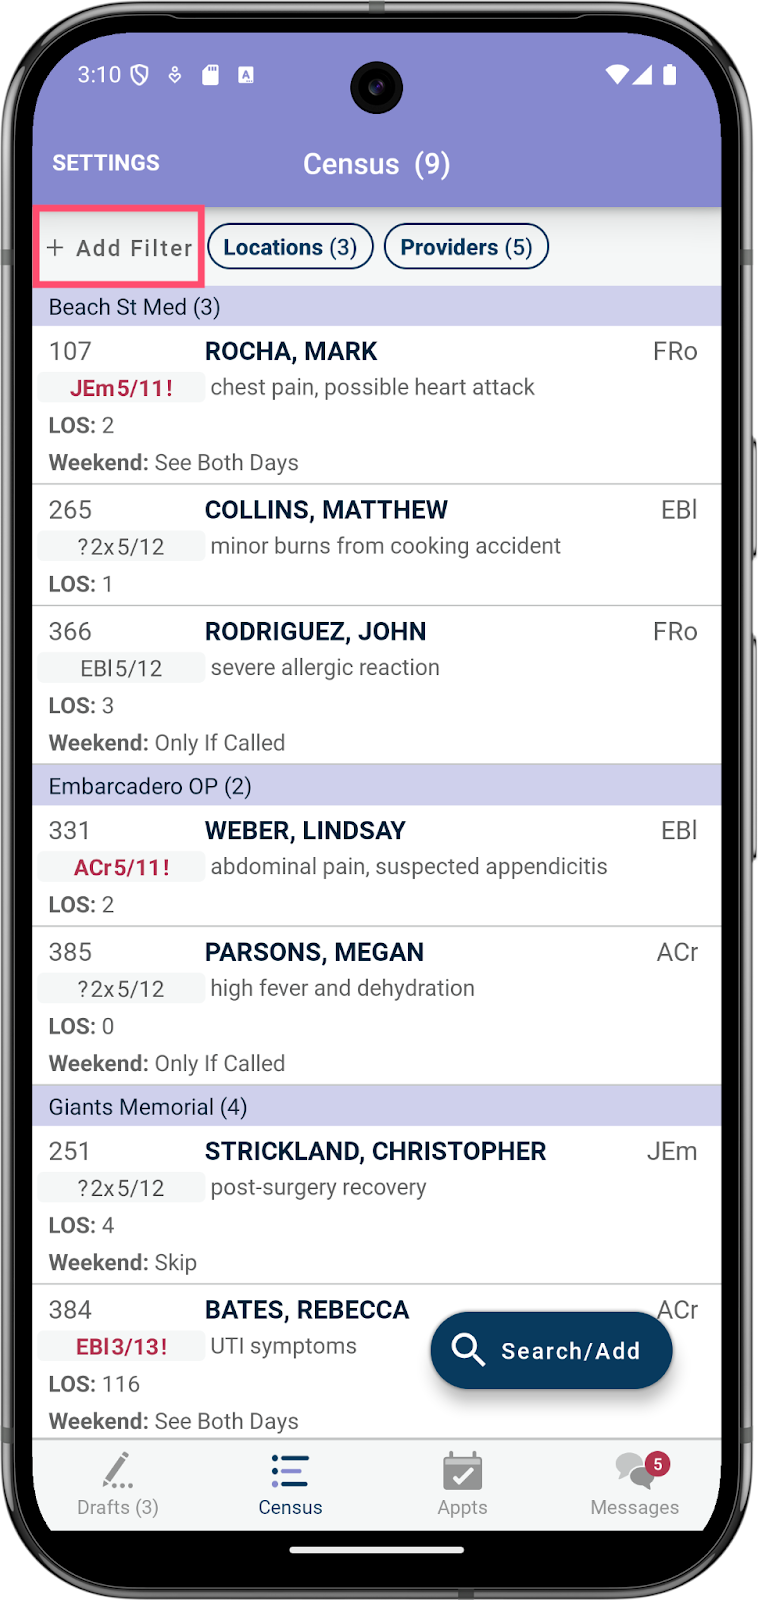
Census
The census is a shared rounding list of active patients currently being seen by your group. This list updates in real time for all group members. It is organized by location, with patients listed by last name, first name.

On the left-hand side, you can see each patient’s room number, if provided. Below the patient’s name, you’ll see the previous visit details. The initials below the room number indicate the last provider to add a visit for the patient. You’ll see the patient’s most recent date of service next to these initials.
If you see N/A instead of a date, it means the patient has no previous visits. If the previous visit information appears red with an exclamation point, it indicates that no visit has been entered in pMD for the patient today. If the information appears gray, it means the patient has already been seen and a visit has been added for today.
To the right of the patient’s name, you may see the initials of the patient’s rounding provider.
You can filter the census to show only the patients currently assigned to you or located at your selected locations. To filter and sort your census, tap the “+Add Filter” button in the upper-left corner. Your selected filters will be saved and automatically applied the next time you log in. On the census screen, you can view your active filters in the top bar and tap them at any time to edit or update your selections.
Adding Charges
After seeing a patient, enter a visit to record their diagnosis, charges, and any other visit-related details. To enter a visit for a patient:
- Tap on the patient’s name in the census.
- This will take you to the Patient Details screen. Notice the patient’s name at the top with their demographics. You will also see the patient’s assigned rounding provider and location here. To enter a visit, tap on Create New Visit in the lower left-hand corner.
- The New Visit screen will appear, showing the patient’s name and demographics at the top. Below that is the Clinical Note section, which serves as a patient handoff field. This shared note is visible to all users in your group and will carry forward to future visits. Keep in mind that completing this field is optional and it is not considered part of the clinical documentation.
- The visit date will default to today’s date, but you can adjust it.

- Scroll down to the Diagnoses and Charges sections.
- Tap Add Diagnosis and type to search by description or by code. You can also scroll through the list of entries. The most commonly used diagnoses, set by your practice, will appear at the top of the list, with all others listed alphabetically below.
- Tap on a diagnosis to select it. You may select more than one diagnosis.
- If the diagnosis you’re looking for isn’t listed, you can free-text it. After searching with no matching results, you’ll see an option labeled “Other: [dx]” — select this to enter the diagnosis manually. Your billing team will review and correct the entry later as needed.

- Tap Done. If you added an incorrect code and need to remove it from the visit, tap on the red minus sign to the left of the code name.
- Next, under Charges, tap Add Charges to view charge codes organized by category. You can also use the search box to quickly find the code you need. Similar to the diagnoses list, the most commonly used charge codes, set by your practice, will appear at the top, with the remaining codes listed alphabetically.
- Select the appropriate charge code(s). Tap Done in the upper right corner.

12. Lastly, save the visit by tapping Save in the upper right corner. This should take you back to the census screen. To confirm proper saving, look at the previous visit details to the left of the patient’s name. You should now see your initials and today’s date in gray with a question mark. This means that the visit you created is saved in your drafts folder. You can then approve this visit and submit it to billing. If you backdate a visit, the visit details on the census will remain in red.

Quick Visit
If you saw a patient yesterday and are seeing them again today with the same diagnoses, you can use the Quick Visit tool to easily add a visit for today’s date of service directly from the main census.
To use the Quick Visit tool, press and hold the patient’s name. A pop-up will appear showing the top five charge codes set by your practice. Select a charge code to automatically save the visit to your drafts.

Consults
If you add a visit for a consult, you may need to complete an additional field. When you add a consult charge in the New Visit screen, you may be prompted to enter a referring provider. To do this, tap the Referred By field near the top of the screen. Use the search box to find and select the referring provider’s name. If no matching results appear, tap “Other: [XX]” beneath the search bar, and free-type the referring provider’s name into the visit.

Discharge
When entering a visit using a discharge or custom sign-off code, you may be prompted—depending on your practice settings—to complete follow-up instructions.
If prompted, fill out the provided fields within the visit.
After saving the visit, you’ll be asked if you want to deactivate the patient: Tap DEACTIVATE THE PATIENT to remove the patient from your active census, indicating that no further visits are expected for them. Tap KEEP THE PATIENT ACTIVE to keep the patient active in your census in case additional follow-up or visits are still needed.
Deactivating a patient helps keep your census current and focused only on patients who still require care.

Adding and Removing Patients
To add a patient to the census:
- Tap on the Search/Add magnifying glass that hovers above the lower toolbar. Note that this icon collapses down to show just the magnifying glass after you’ve started scrolling. You can search for the patient by (last name, first name), MRN, Cell, or DOB.


- If your search returns matching results, you will see them listed under the Inactive Patients.
- Tap on the correct patient. This will pull up the Patient Details screen. From here you can select Activate in the lower left. This will prompt you to choose the patient’s location, and then add the patient to the census list. From here you can either tap Save to return to the census, or Create New Visit to enter your charge.

- If your search does not return any results, tap +Create new patient. Select the patient’s location, which will bring you to the Patient Details screen. On this screen, you’ll provide the patient’s DOB and Sex. Any field with an asterisk is required, and the others are optional.

To remove a patient from your census:
You can remove a patient from the census in three different ways:
- You can swipe left over their name on the census. Tap Deactivate on the right hand side
- Tap on the patient’s name from the census to bring up their Patient Details screen, Under Episode of Care toggle Active on Census to OFF.
- You can add a visit for the patient and use a discharge or custom sign-off code as the charge code. When you tap Save, you will be prompted to remove the patient from the census, Tap DEACTIVATE THE PATIENT to remove.

Updating Patients
Tapping on a patient’s name in the census will bring you to the Patient Details screen.


On this screen, you can do any of the following.
- Update demographic and clinical information such as location or room number.
- Update the listed rounding provider. To do so, tap Rounding and select a provider’s name from the list.
- View the patient’s visit history of previously submitted charges. This is listed under Visit Hx in the bottom left corner.
- Access and update the clinical note field by tapping on Add a Clinical Note directly below the patient’s demographic information. This is a shared field that displays on the census and can be used for rounding notes or patient handoff within pMD. If there is already text in the clinical note, you will see that displayed here instead.
In addition, you can send messages to other users in your group about a specific patient.
To do this:
- Scroll down to the Chats section.
- Tap Chat About Patient.
- Select a contact from your list and type your message.
Messages sent this way are directly linked to the patient’s profile, eliminating the need to re-type the patient's name or details. This also makes it easier to quickly access the patient’s information for future reference.
Editing & Approving Charges
Tap on the Drafts button in the lower-left corner of the app. Here is where you will see the visits you’ve created but have not yet submitted to billing. Note, visits are not sent to billing until you tap Approve.

Tap on the patient’s name to open the visit details. From here, you can review, edit, approve, or delete the visit.

Back on the drafts page, you can also bulk approve all of your visits by tapping Approve All to send them to the billing team for processing!

To edit an approved charge, you have a few options.
- You can add a new visit for the patient. Add the correct charge in the Add charges section. Use the Additional Notes text box to indicate your requested correction. Save and approve the visit as normal.
- Alternatively, you can send a message to a biller or supervisor and request the changes. From the census, tap on the patient’s name. Scroll to find Chat About Patient. Tap this button and select the biller or supervisor. Type out a message that indicates your requested correction. Send the message.
Messaging & Communication
To access the HIPAA-compliant messaging and communication features, tap on the Messages icon in the bottom right corner.
How to communicate with colleagues?
To start a new message with colleagues, tap the + Compose button in the lower right corner. Note that this icon collapses down to just the + icon after you’ve scrolled. After tapping on this icon you will find the pre-loaded contact list of everyone in your practice. Tap on a user’s name to select them as a recipient. You can add more than one colleague by tapping the plus button to the right of the name listed at the top of the new message.
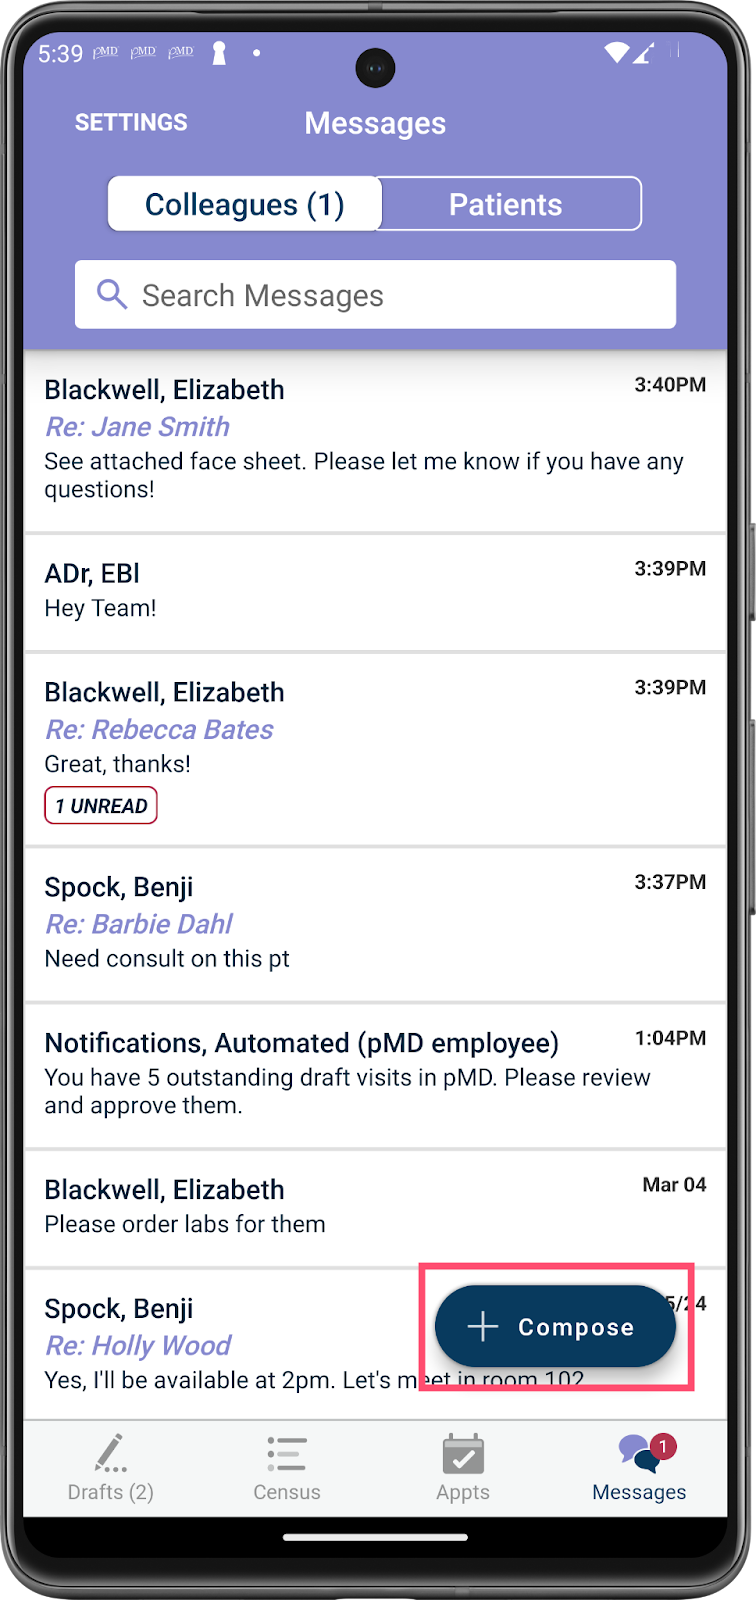

Compose your message in the text box. Once your message is ready, tap Send!
Sending a message about a patient
From the census, tap on the patient’s name and scroll down to Chats. Tap Chat About Patient, select a contact from your list, and type out your message.

These patient-centric messages will be linked directly to the patient’s profile in pMD, eliminating the need to re-type the patient’s name or information and making them easy to access for future reference!
How do I search pChats?
The search bar will be at the top of the Messages list.
Begin typing into the search bar to find specific words within your conversations. pChat™ Search even supports multiple words – continue typing to narrow your search.

How can I access settings and support?
To access settings and support, navigate to Messages. You’ll see a Settings button in the upper left corner. On this screen, you can customize your notification tones in pMD, away message, and unread reminder settings.
Still have questions or need additional assistance?
You can reach pMD’s 24/7 support at 800-587-4989 x1 or by tapping on the Contact pMD button located in Messages and then Settings in your mobile application or at the bottom of your screen on the pMD website.
