
LOGIN
Navigate to www.pmd.com and locate the Practice Login. Your username was provided to you in your welcome email along with a password reset link. Once you've created a password, enter both your username and password in the appropriate fields.
CENSUS
Navigate to the Patients tab, where you’ll see the census. This is a rounding list of patients currently being followed by your group. It’s a shared list, so all additions and updates will be visible to all providers in your group.
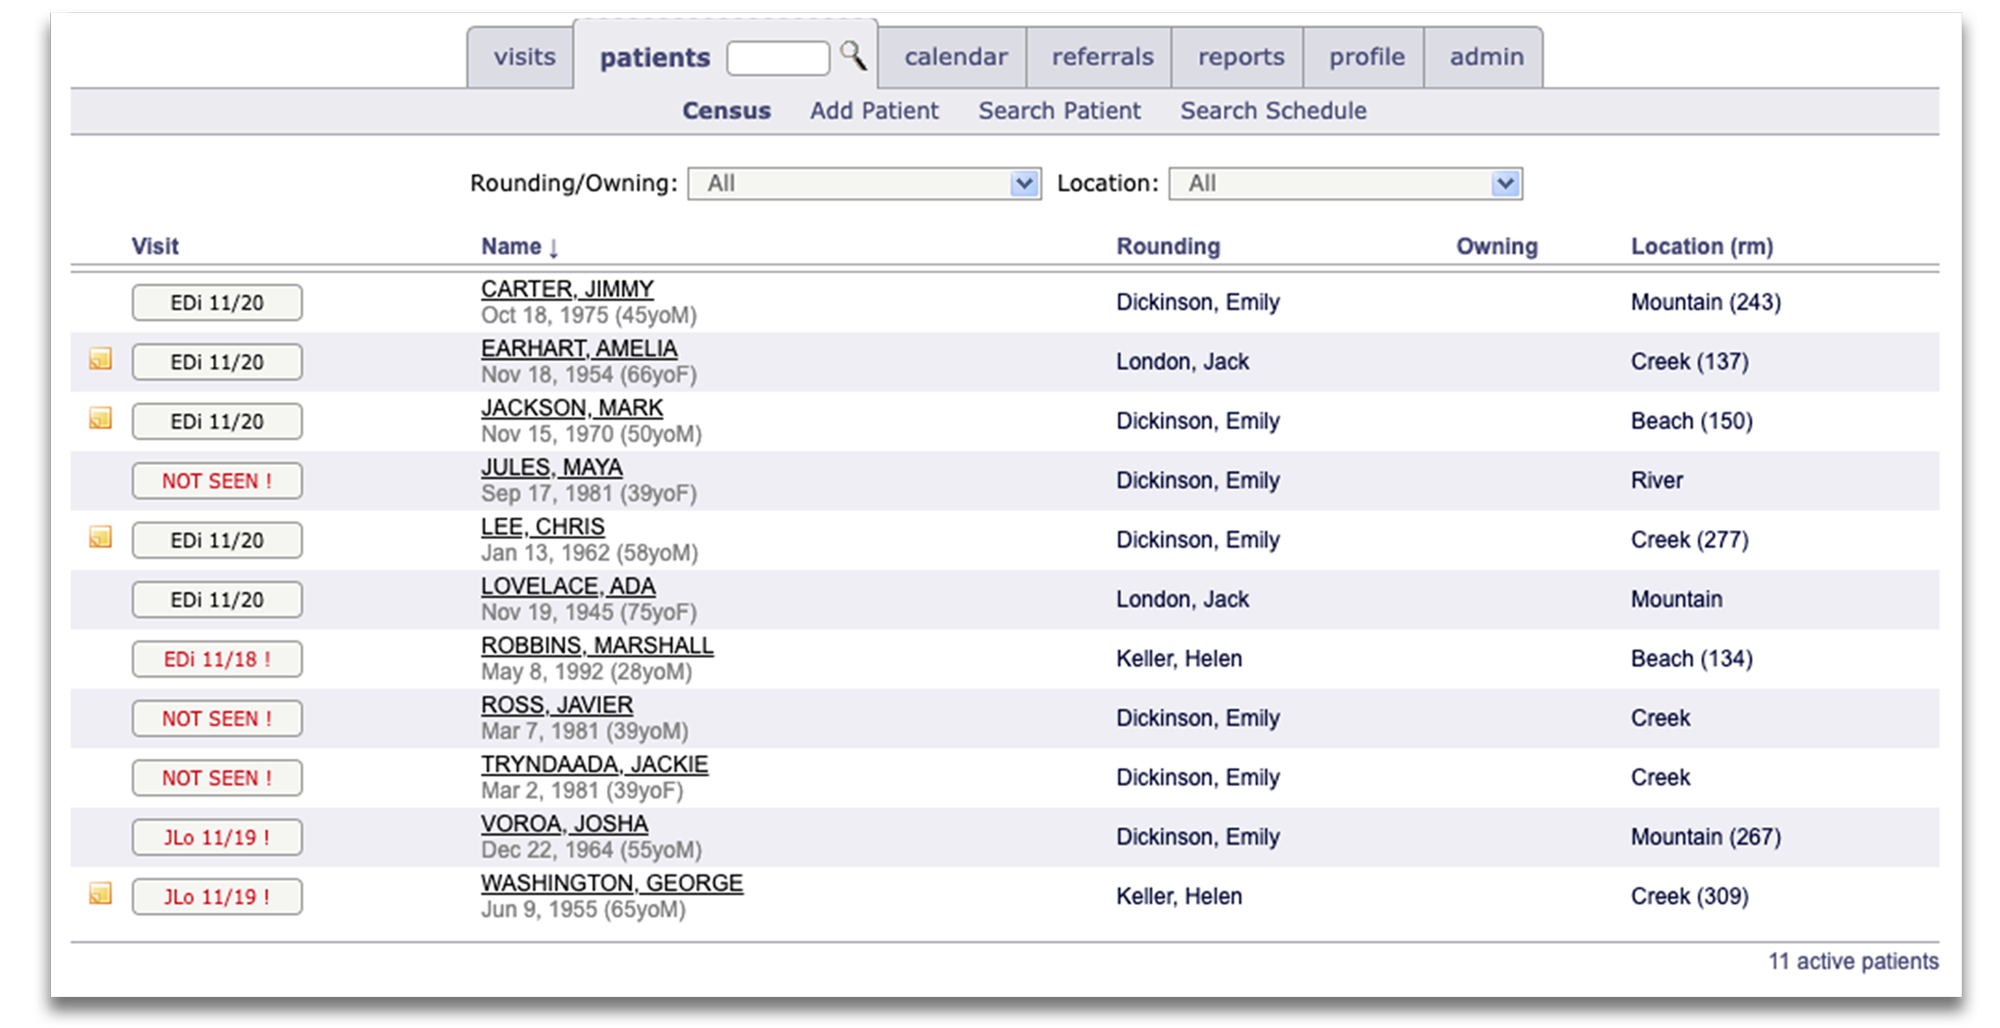
Things to note:
- On the left-hand side of a patient’s name, you’ll see the previous visit details. The initials show the last provider to bill for the patient and the most recent date of service. A NOT SEEN! in this field indicates the patient has no previous visits, for example, a new consult or admission.
- If the previous visit details are red with an exclamation point, it means the patient has not been billed for today. If the information is gray, it means the patient has already received a charge for today’s date of service.
- To the right, you’ll notice columns for the rounding provider, location, and department
- Yellow sticky notes to the left of a patient’s name can store clinical notes entered for sign-out or patient handoff.
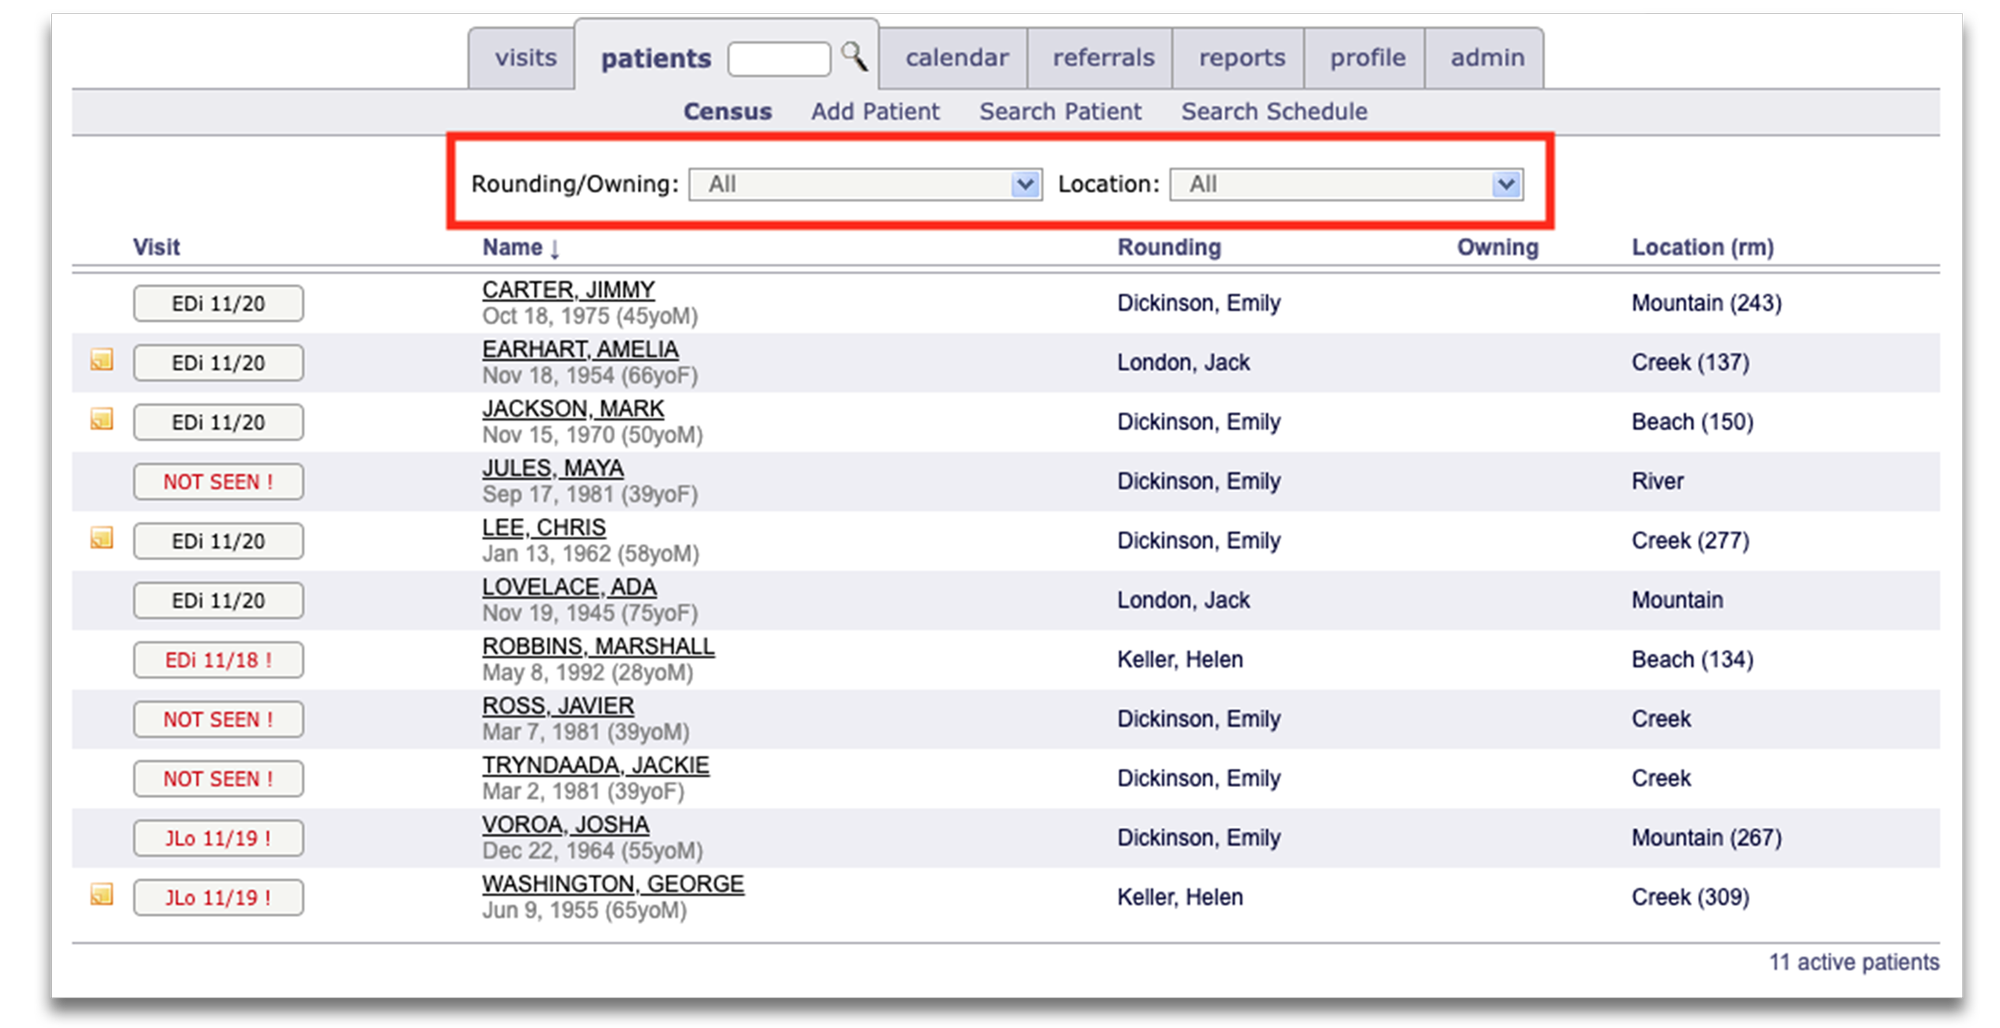
Towards the top of the census list, you'll have drop-down options by which to filter if needed.
ADDING & REMOVING PATIENTS
To add a patient to the census:
- Search for the patient (last name, first name) using the search box located in the Patients tab and hit enter or click the magnifying glass.
- If the patient is in the database, they will appear for you to click on their name. If the patient has a checkmark to the left of their name, that means they are already active on the census.
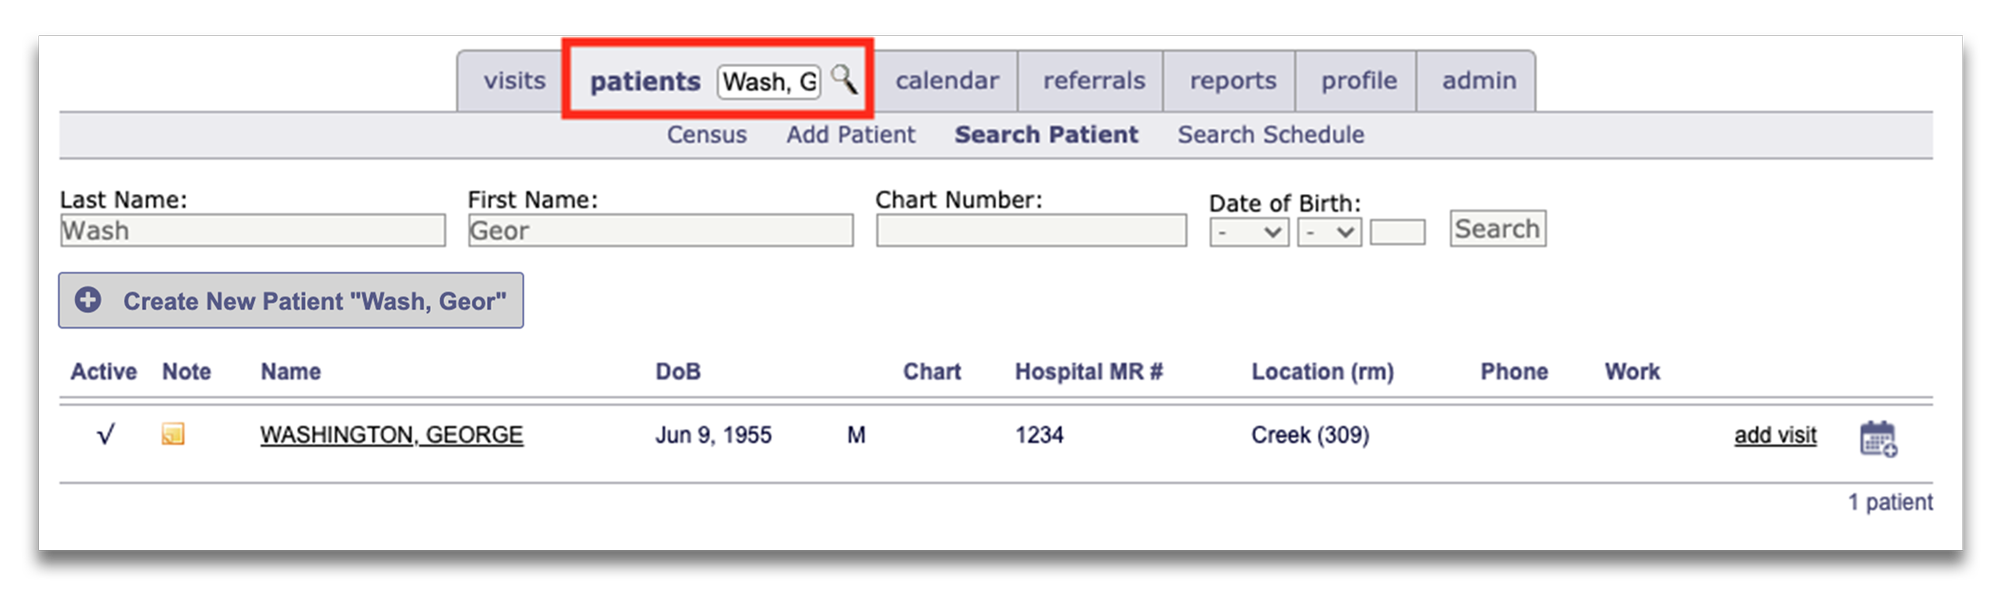
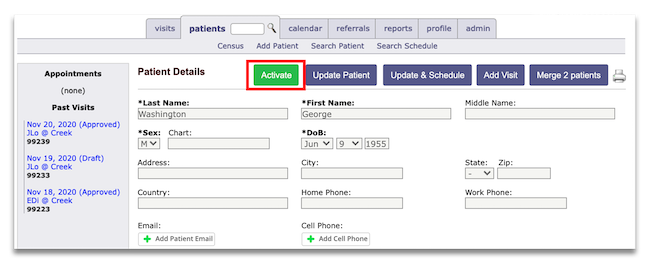
- After clicking on the patient’s name and being brought to the Patient Details screen, click on the bright green Activate button to add the patient to the census.
If your search does not return any results:
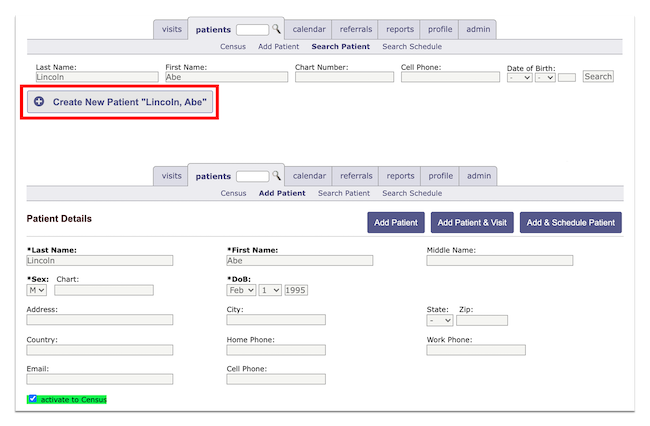
- Tap +Create New Patient.
- In the Patient Details screen, you will need to complete filling out the patient’s basic information. Any field with an asterisk is required, while the others are optional.
- Make sure the activate to Census box (highlighted in green) is checked if the patient should be added to the list of active patients, and then click the purple Add Patient button at the top-right.
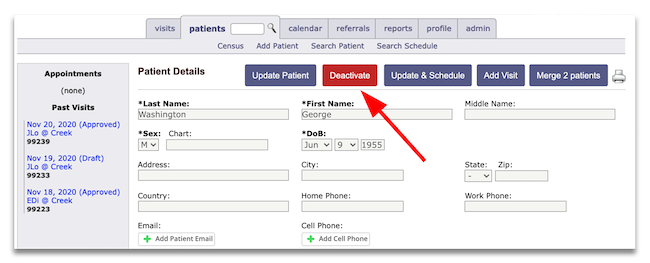
To remove a patient, click on their name from the census and click on the red Deactivate button towards the top of the Patient Details screen.
SCHEDULING APPOINTMENTS
To schedule an appointment for a new patient, follow the steps above to create a new patient and click on Add & Schedule Patient to immediately add an appointment for this patient.

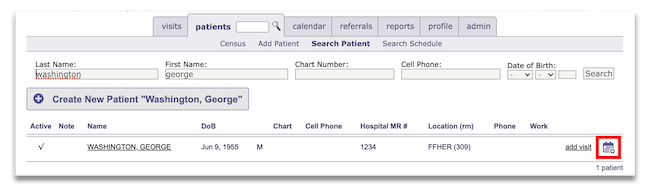
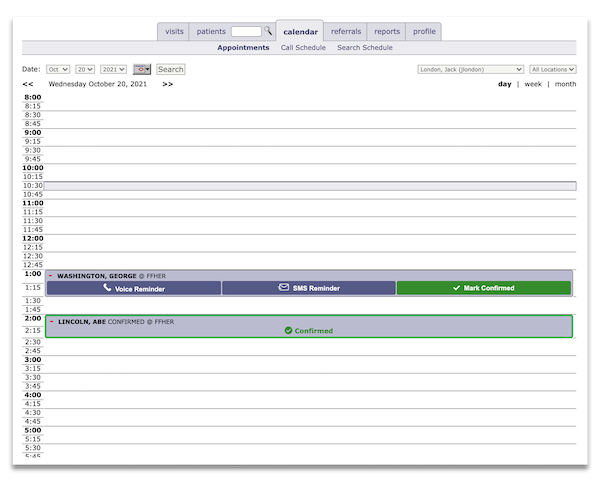
To schedule an appointment for an existing patient, search for the patient in the patient tab (last name, first name), and click on the calendar icon to the far right of the patient’s name.
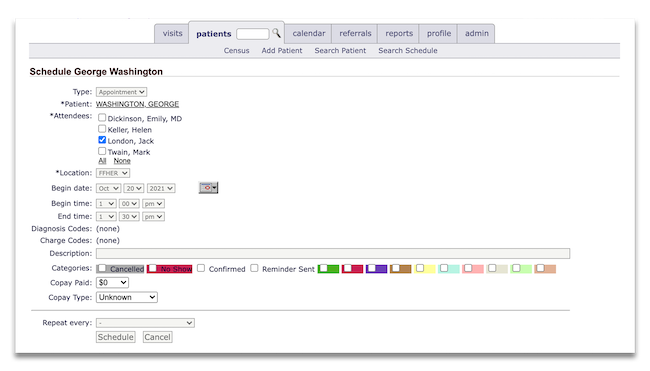
Once in the scheduling screen, enter the details for the patient’s appointment.
To send an appointment reminder, click on the Calendar tab, search for the appointment, and click on one of the reminder options. The patient can receive a voice call reminder or SMS text reminder. Click Mark Confirmed if the patient has confirmed their appointment time. Appointment will automatically mark as Confirmed if the patient has confirmed via SMS reminder text.
UPDATING PATIENTS
Click on the patient’s name to bring you to their Patient Details screen.
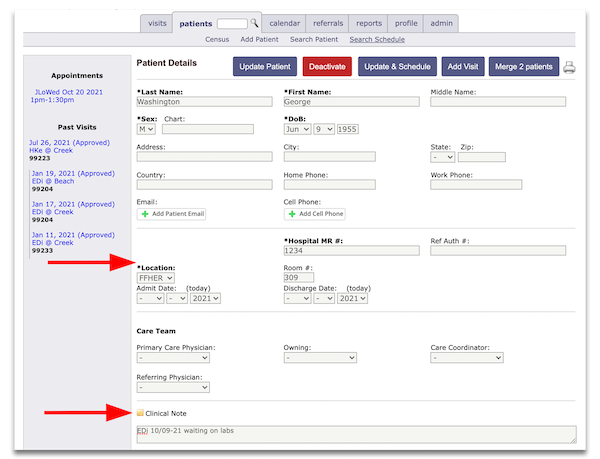
On this screen, you can:
- Make updates to the demographic and clinical information, such as location or room number.
- Update the Rounding Provider by clicking on the Rounding dropdown and selecting another provider’s name from the list.
- Update the clinical note field by clicking into the box below Clinical Note. This is a shared field that displays on the census as a yellow sticky note to the left of a patient’s name and can be used by providers for rounding notes or patient handoff.
- View the patient’s visit history on the left side of the screen.
MESSAGING & COMMUNICATION
To access the messaging and communication features, click on the envelope icon on the right-hand side to expand the messaging panel.
How do I send messages to colleagues in pMD?
To start a new message with colleagues, tap Compose in the upper right corner. You will find the preloaded contact list of everyone in your practice. Click on a user’s name to select them as a recipient. You can add more than one colleague by clicking the + button to the right of the name listed at the top of the new message.
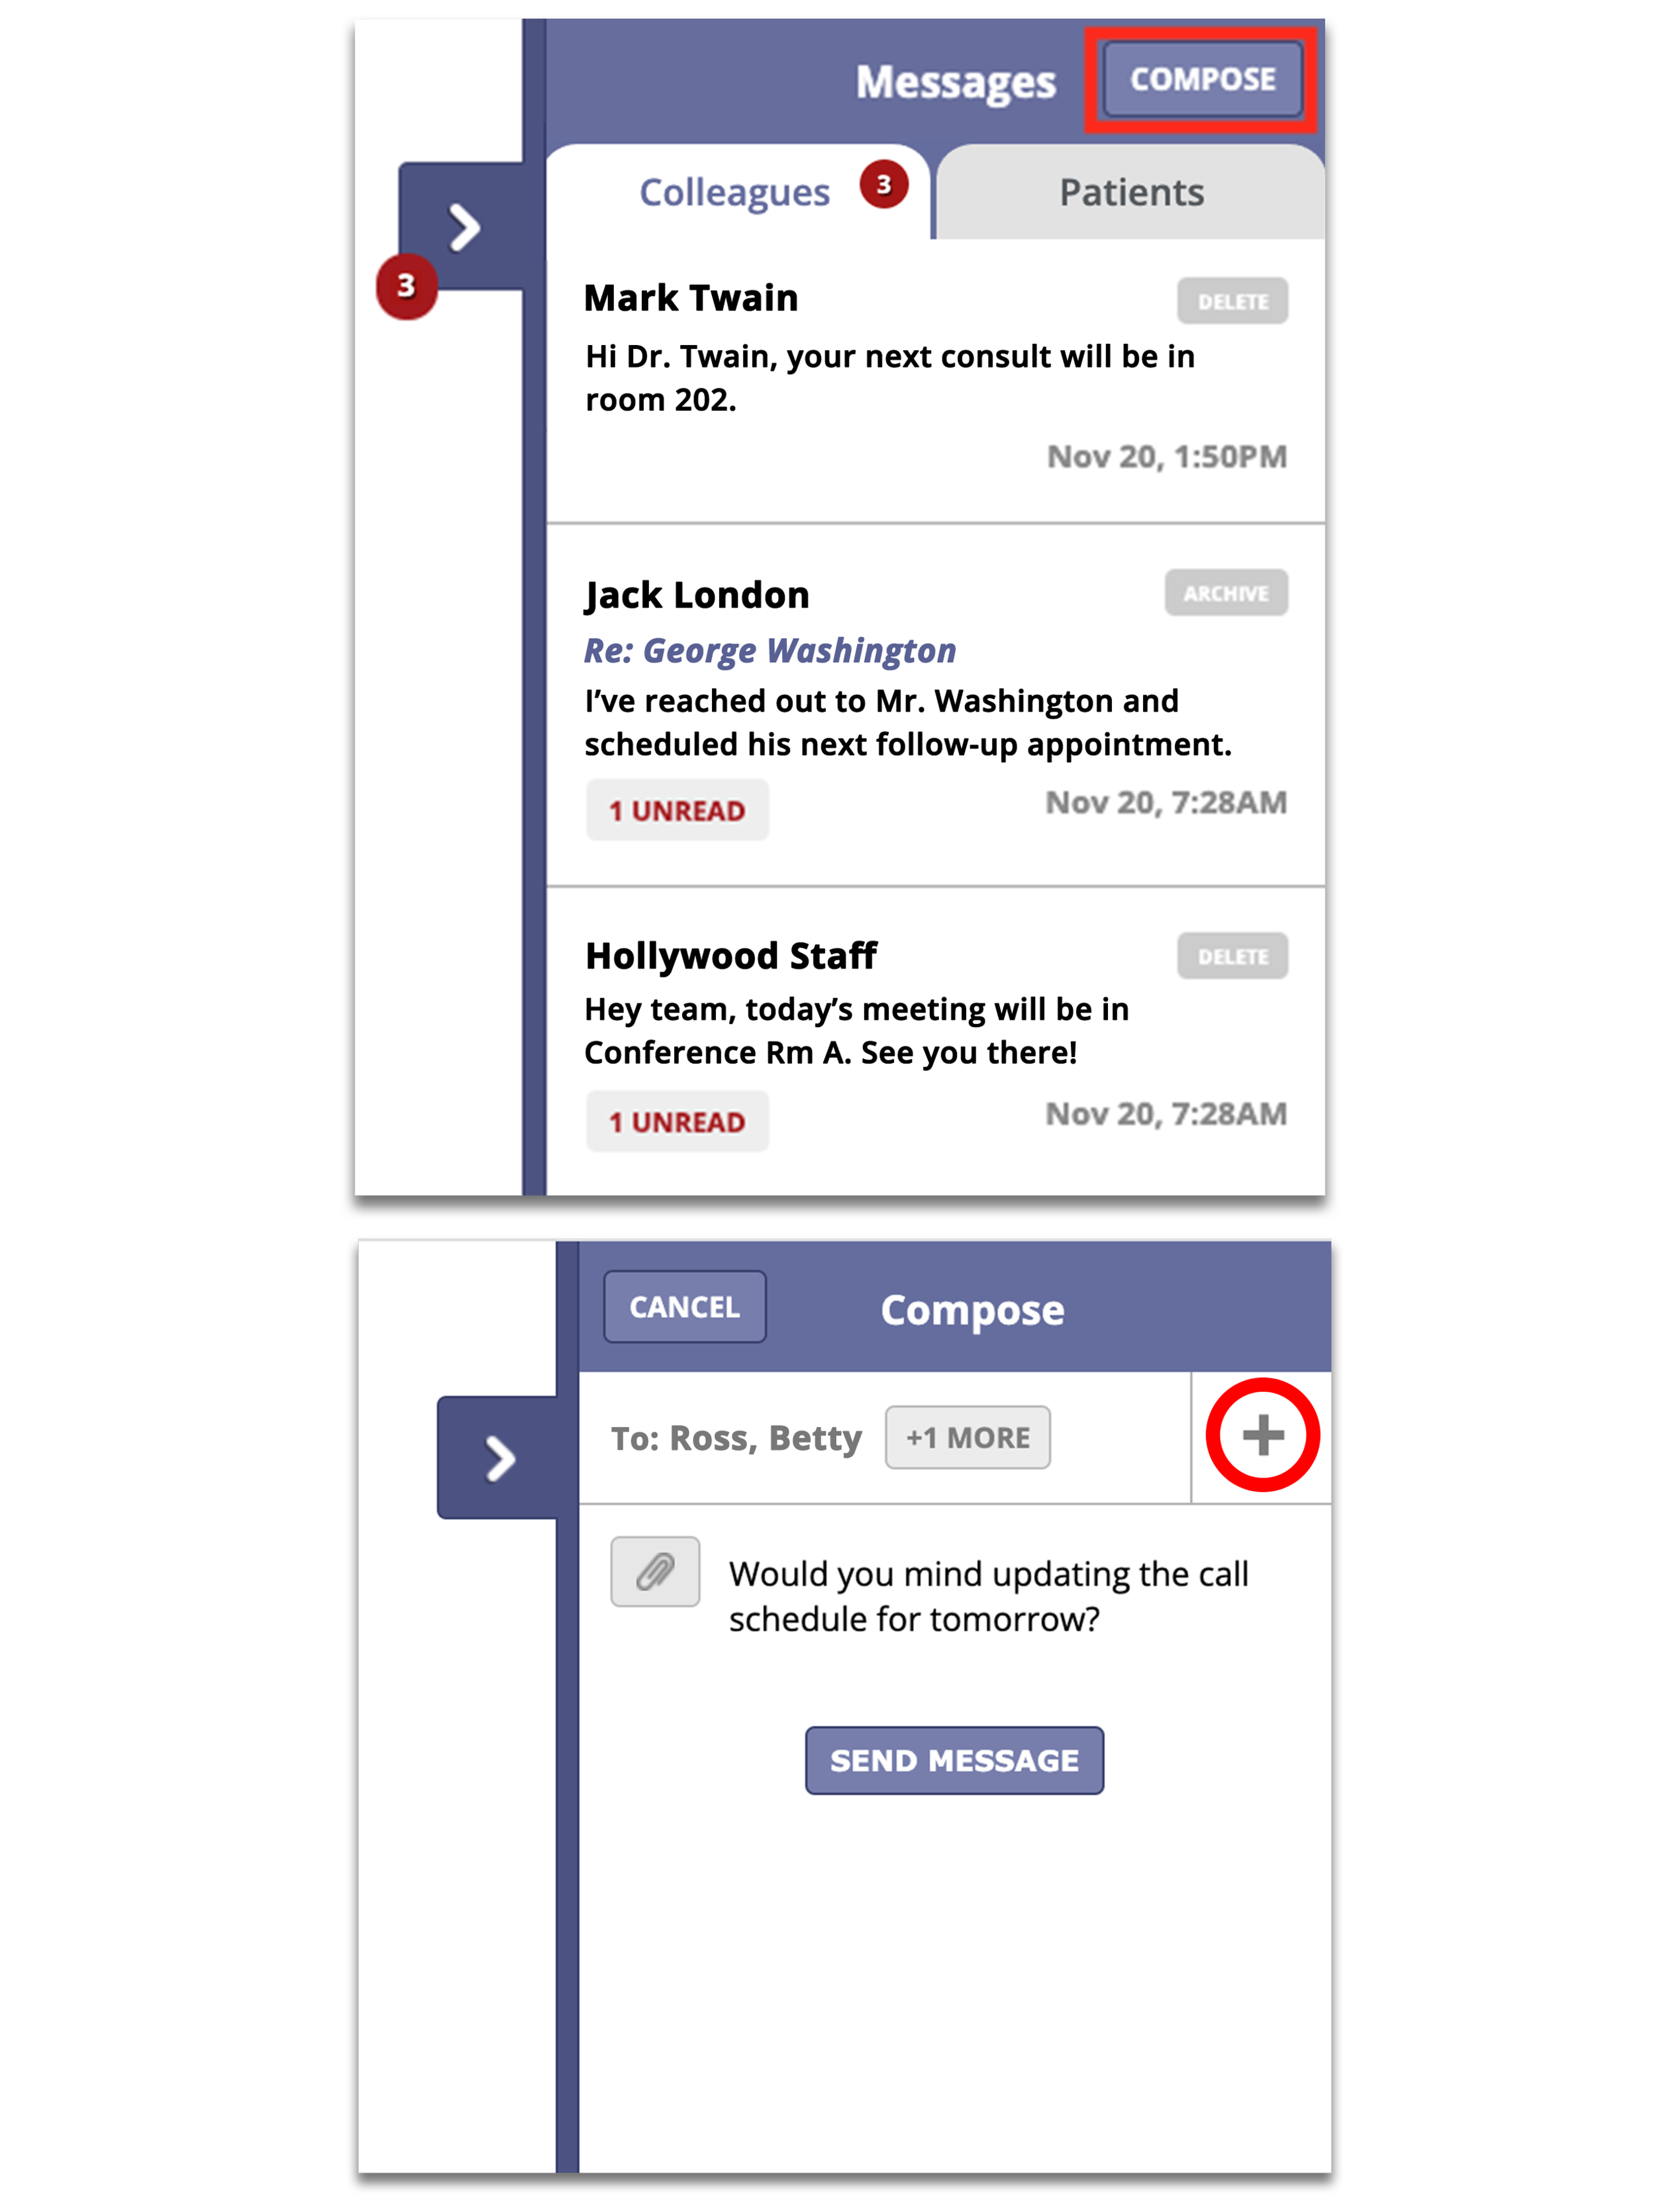
Compose your message in the text box. Once your message is ready, click Send Message!
Sending a message about a patient
From the census, click on the patient’s name. Click on the purple Chat about Patient button. Select a contact from your list and type out your message.
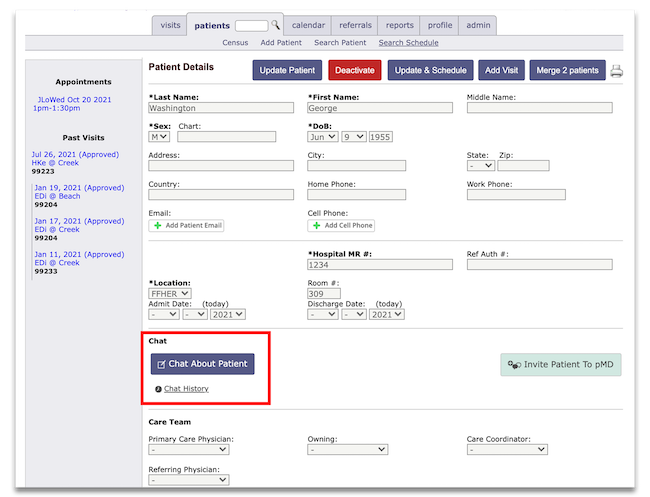
These patient-centric messages will be linked directly to the patient’s details screen in pMD, eliminating the need to re-type the patient’s name or information and making them easy to access for future reference!
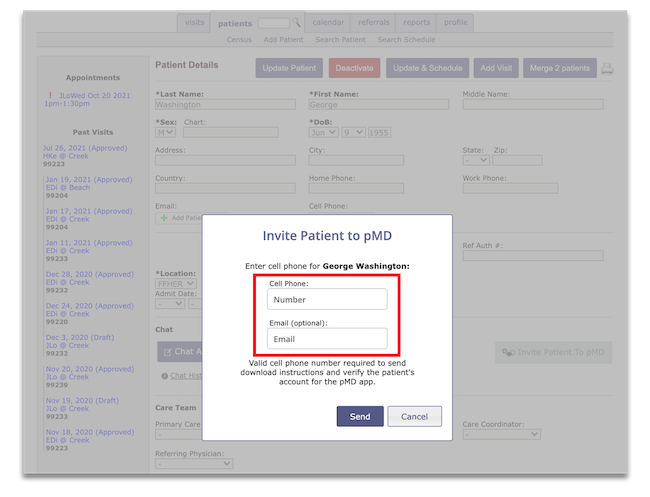
How do I enroll a patient with pMD?
After locating the patient in pMD, click on the patient’s name to view the Patient Details screen. Click on the green button labeled Invite Patient to pMD in the Chat section.

Enter the patient’s cell phone number and optional email address.
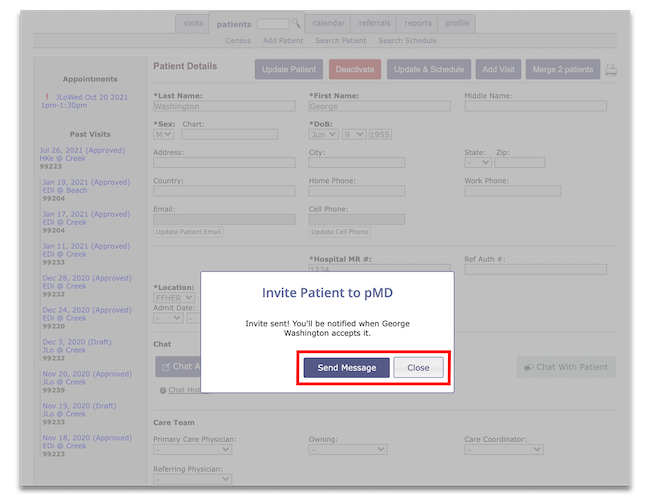
You’ll receive confirmation the invite was sent and have the option to send a message to the patient or close the window.
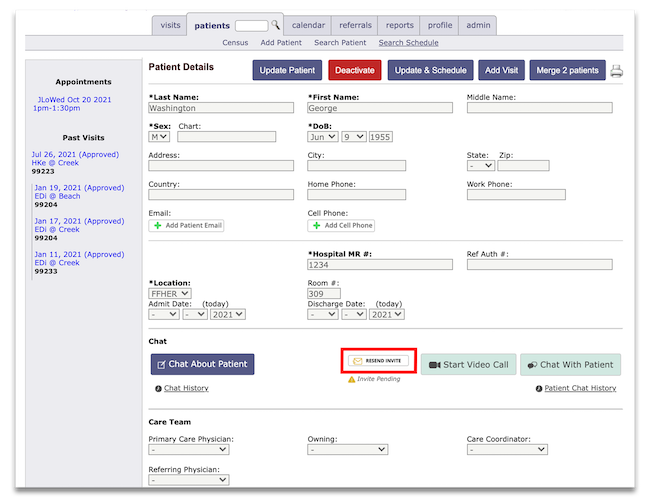
If you need to resend the invite to the patient, click on the Resend Invite button located in the chat section of the Patient Details screen.
Still have questions or need additional assistance?
You can reach pMD’s 24/7 support at 800-587-4989 x1 or by tapping or clicking on the Contact pMD button located in Messages and then Settings in your mobile application or at the bottom of your screen on the pMD website.
Last modified: October 29, 2021